
Preproduction
Scale
Starting preproduction I realized a lot of what I wanted to include in my game was stuff I had not achieved practically inside of unreal yet so I decided I wanted to start with a block out inside of Unreal Engine so that I could try out some of the vital mechanics that I need for this project. I formatted the project and then downloaded the plugins I was planning on using. For this environment, I, of course need an ocean so I download the unreal engine water package and made a small landscape to try it out.

It's a proof of concept for the island and it shows off how I plan to build up the rest of my level. I implemented a character and created a scale guide for a palm tree. This is as small as my current landscape scale will let me build an island tho i believable i can make a more consecrated landscape that will help me create those smaller island details.
Game Design
Game design is an important part of game development and i believe if i follow my research when constructing the rest of my planning i will be be able to create the project while staying true to my initial goals. This will be important when trying to construct the proper atmosfear i have planned out of the project.
Assets
Planning is important when keeping up with production so I have created this helpful production plan so that I keep track of all the ideas I want to bring to the game as well as display and save what part of the production pipeline it is currently in. It also doubles as an asset priority list as I will be working from the top-down of the list.


Palm Tree
Palm Trees going to be one of my biggest assets so it's important they look good and meet the design language of the project in its entirety. Providing shade I would like the palm trees in my game to be a relaxing area for the player to be in when spending time not looking into the narrative. I'm going to be using tree it to create the palm tree model as I feel this will give the best mesh for what I'm looking for.
I gathered a large variety of palm tree imagery onto a pure ref board that i can refer to when making design decisions. I have multiple angles and different compositions of trees in this board so that i when it come to the level design i can also use this page to reference what kinda of tree placement i think will work best. Currently i think having 2 palm trees holding up a hammock in-between them will look great in the level.

Hammock
A Hammock is one of my latest ideas for an asset as I feel it ties in perfectly with the vibe and style of game that I'm producing. It is a naturally relaxing environment in itself and will add another layer of depth to the island. hanging it from the palm trees would also make a great-looking composition that I can focus on when taking screenshots to help promote my game.
A challenge of creating a hammock would be the difficulty of creating fabric in a game engine. This is something i will research tho i might end up just creating it as a solid model just there to ad detail instead of letting the player mess around with it.

Bottle
Taking my message in a bottle idea i have decided to combine it with a slightly larger format of create or trade cargo case of rum type thing. This decision comes from looking out my rough scale guid as i feel a single bottle would go unnoticed and ignored and this would be a waist of development.
I do want to keep the narrative elements of this prop tho so it will still be used as planned tho it will look different from my original idea.
I very much enjoy the shapes and style of some of these old creates from the age of the spice trade so i think ill go with this design.

Water
I built the material in 2 parts, the first defining the colour and translucent values of the material the other lairing the normal map to create different ripple variation and a less visible movement pattern that will hopefully be more emissive this is show below.
This is not the final texture I would use for this project if I decide to continue on this path. The current values and normal maps are just place holders as I work out the rest of the material. This way if I decide its not for me I will not of spent time doing stuff that just wouldn't get used.
The foundation of the this part of the material is the normal maps and how each copy interact with the final value. The Panner node moves the the texture with a given direction and magnitude show in unreal as just a simple vector. by layering multiple of panners of the same map but with each a different vector a ripple effect produced as the water looks like it is traveling at different speeds and directions while still being on the same plane. The world position is placed into the panner as well as this replaces the uv value that come default. The combination of all 3 normal are bound back together by 'concatenating' and 'deriving' each of the colour values. I cant say I understand how that works but from the point of view of unreal we use the append node on the R and B colour values to combine them or concatenate them. The derive node is just a way of working out the blue values by looking at the red and green values.

When you look at water depending on the angle you are looking at the surfaces in relation to your eyes. The same goes for unreal, the value of the measurement from your eyes to the surface of the water is called the pixel depth and the value from you to the bottom of the ocean is the scene depth. These values are used to derive the depth of the water you are looking through at any given time. This is simply done by subtracting the relative distance of the surface of the water (pixel depth) and the relative distance of the ocean floor (scene depth). With all that set up we are able to degrade the amount of colour reflected at according to how much water you are looking though. This brings its own problem though as depending on the angle of view the depth will appear to change. The real depth is measured from the surface to the floor not depending on the camera but depending on the world position.
The last part to the material is the Fresnel shader that is used to better represent the interaction between the light meeting the corners of objects in are water. Its based on an effect found in the real world that shows depending on the viewing angle the amount of light reflected would appear to be more if the surface was flat from the observers point of view.

The final effect is as see in the photo below.


You can see that in its current state its way to dark and and would not be fitting if I used this in my final production though I do think I'm able to adapt this to how I would like in the future. The white blocks in the environment are just there so I can see how the transparency changes and things like that.
A Decision About Water
With the end of the fmp within site the time has come to make a decision about my workload in relation to quality. Water is of course a massive topic to cover and even more complicated to cover when applying it practically. It will of course be a lot easy to use the unreal plugins to create the water even if it does mean creating a bigger landscape to get it to work.
I plan to develop the rest of the practical in a way that I can make this decision closer to the of the project and I can have a look to see how much work I have left to do and how much time I have and then ill make a decision on what route to take when it comes to water.
Creating Game Ready Assets
As I researched before I decided to create a collection of assets to help tell the narrative of the game. Creating assets for games differs from creating assets for any of industry as you have to worry about how well it will run on a players commuter. To create game ready assets I have employed a number of different techniques I have learned about throughout the year.
I applied these techniques to one of the models I have been working. The bottle asset I have created I model as a low poly model then smoothed it out with a lot more model as a second model. With both theses models I imported them to substance 3d painter then baked the detail from the high poly model. This proses takes all of the detailed maps and applies them to the low detail model saving on the amount of polys that will be in the final game.

Real Time Glass
The idea of the bottle was to be an old glass rum bottle carrying inside it a letter that I can then right into the story of the game. It was important that the material I create would be able to be seen and looked into. For this I decided to create a simple translucent material that I could apply effects to create the look of glass


This was a lot more simple then creating the water texture. All it is is basic values of are material being applied at variable quantities according the Fresnel shader I plugged into the Lerp. The Lerp takes the value between the maximum and minimum scales I set up to hold the values of the material.
All i had left to do was import the bottle and apply the texture. I was quite happy with how it turned out and i consider it finished though if we had more time I would have liked to ad the message into the bottle or even create an interaction for the player.


Even More Water
My struggle with water continues though I did make progress this week as I started work on a what foam system that I could implement into my project in the future to increase the emersion and atmosphere of my project yet again.
It works by using a surface detection node to find the nearest surface and then it applies the foam expanding outwards from that point. This video also explained and easy way of creating caustics. There proses was as simple as moving to caustic maps in different directions creating an overlap effect similar to the normal map wave effects i made early on in the FMP.


In the end I ended up creating an almost complete water shader but in uses the same ray casting method to calculate depth so I will spear the details and I'm not going to repeat myself here.
Barrels
Barrels are a very reusable asset meaning I could use them a lot inside of an environment without it feeling very out of place this is a technique used by artists to cut down on the number of time spent in the modelling phase. Creating a barrel was easy enough as I was able to use the same cylindrical technique that I mastered when modelling the bottle before in the project.
Because of the simple nature of the Barrel I did not require many references to be able to create the model and i can say that this really helped speed the research stage of the game up by quite a bit and left me more time complete the modelling and texturing part of the process. This turned out very useful as i ran into a problem when baking the smoothed high poly maps to the model. The problem generated pinching around the corners of the metal bands around the barrel. From asking my lecture we deduced that in fact it was a problem to do with the sides of the low poly barrel not quit lining up correctly.
As the model had already been created I made the decision to reduce the problem to a point that you wouldn't see it in game though it would still be there and to do this I just detached the rings and made them there own models. The final effect is rather decent and for the product I'm making it works just fine.


Using Mega Scans Assets
Before the project ends I really wanted to have trees in my environment and having most of my time been spent looking into water I decided to compromise and download a free asset from mega scans.com. This does so much for the scene and really brings life to the island and I would defiantly look into using them again in the future. I would of preferred having all of my work be my own in this project though so if I continue this after the deadline of the fmp I will look into creating my own palms for island.

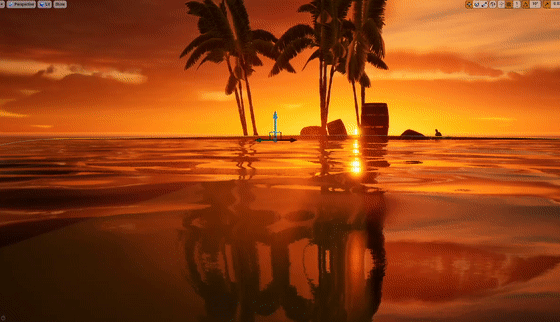
Camera, Composition and Post Processing
Setting up my assets and composing my scene was a lot of fun, seeing the project come together into something that looked half decent was rewarding and it also felt notice to be coming to the end of the fmp. I used Unreals built in composition guides to help me find good locations for the camera.
Unreal Engine lets you adjust the focal length and aperture of a camera like in real life so in the picture below I lined up the tree on the left with the rule of thirds composition guide and adjusted the aperture to get all of the tree in focus. You can see in that shot that I have used a lenses flare post process effect to amplify the effect of the sun in the shot. if I took This shot again I would propyl make it warmer but other then that I think this shot worked well.
